제가 혼자 공부하면서 발생했던 invalid url 오류에 대해서 해결했던 과정을 블로그에 작성해보겠습니다 :)
1. 문제 발생❓
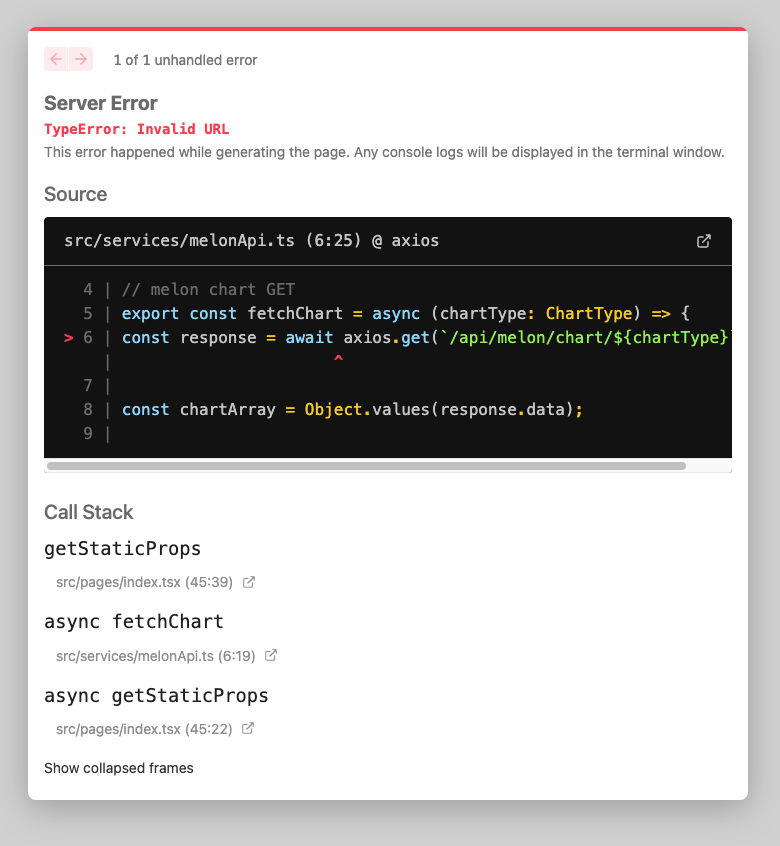
Server Error
TypeError: Invalid URL
오류 위치: src/services/melonApi.ts (6:25) @ axios
2. 원인 추론 🔎
getStaticProps 함수는 서버 측에서 실행되기 때문에, 상대 URL 경로 ( /api/melon/chart/${chartType} )를 사용하면 기준점이 없어 "Invalid URL" 오류가 발생합니다. 여기서 발생한 문제의 핵심은 CORS(Cross-Origin Resource Sharing) 이슈와 서버 사이드 렌더링의 특성이 결합된 것입니다:
- CORS 이슈 해결 방식: 이전 작업에서 클라이언트에서 외부 API로 직접 요청하면 발생하는 CORS 오류를 해결하기 위해 Next.js의 API 라우트 ( /api/melon/chart/${chartType} )를 프록시로 사용하는 패턴을 채택했습니다. 이 API 라우트는 클라이언트 측에서 호출될 때는 정상적으로 작동합니다.
- 서버 사이드 환경의 제약: 그러나 getStaticProps는 빌드 시간이나 ISR(Incremental Static Regeneration) 재생성 시 서버에서 실행됩니다. 이 서버 환경에서는 ( /api/melon/chart/${chartType} )와 같은 상대 경로가 브라우저처럼 자동으로 현재 도메인에 기준하여 해석되지 않습니다.
- 브라우저와 서버의 차이: 브라우저에서는 ( /api/... )와 같은 경로가 자동으로 현재 도메인(ex: http://localhost:3000/api/...)으로 확장되지만, Node.js 서버 환경에서는 이러한 상대 경로가 유효한 URL로 인식되지 않습니다.
- API 라우트 특성: Next.js의 API 라우트는 클라이언트에서 요청될 때는 접근 가능하지만, getStaticProps와 같은 서버 사이드 함수 내에서는 직접 호출할 수 없습니다. 서버 사이드 함수는 빌드 시점에 실행되며, 이때 API 라우트는 아직 활성화 되지 않은 상태입니다.
결과적으로, 이전에 작업했던 CORS 이슈를 해결하기 위해 도입한 API 라우트 패턴이 서버 사이드 렌더링 환경에서는 오히려 "Invalid URL" 오류를 발생시키는 원인인 되었습니다. 이는 프론트엔드와 백엔드의 경계가 모호한 Next.js와 같은 프레임워크에서 종종 발생하는 문제입니다.
3. 해결 과정 📋
문제를 해결하기 위해 baseUrl을 사용하여 API 요청을 직접하도록 getStaticProps 함수를 수정했습니다.
// pages/index.tsx
export async function getStaticProps() {
  try {
    const response = await baseUrl.get(`/chart/day`);
    const initialData = Object.values(response.data);

    return {
      props: { initialData },
      revalidate: 3600, // 1시간마다 재생성
    };
  } catch (error) {
    console.error("데이터 가져오기 실패:", error);
    return {
      props: { initialData: [] },
      revalidate: 3600,
    };
  }
}
< 채택한 방식 >
- 초기 데이터 로딩: getStaticProps 활용
- 빌드 시점 서버에서 초기 데이터 initialData를 먼저 가져옵니다.
- 추후 데이터가 바뀌거나 필터 변경 시: Tanstack Query 활용
- 내가 만든 useChart 커스텀 훅에 initialData 옵션을 전달하여 서버에서 가져온 데이터를 초기값으로 활용합니다.
- 사용자가 필터를 변경하면 Tanstack Query를 통해 클라이언트에서 새 데이터를 가져옵니다.
- initialData로 가져온 데이터는 서버에서 미리 가져온 데이터를 사용하고, 필터 변경 시 다른 데이터 타입은 클라이언트에서 새로 요청을 합니다.
- 데이터 캐싱을 통해 중복 요청을 방지하고 성능을 최적화 합니다.
이 접근 방식은 서버 사이트 렌더링의 이점(빠른 초기 로딩, SEO 개선)과 클라이언트 사이드 상태 관리의 이점(반응성, 캐싱)을 모두 활용하는 최신 웹 개발 패턴으로, 사용자 경험과 성능 모두를 최적화합니다.
<전체 코드>
// pages/index.tsx
import Head from "next/head";
import styles from "@/styles/Home.module.css";
import MusicList from "@/components/MusicList";
import styled from "styled-components";
import { MelonChartList } from "@/types/melon.type";
import { baseUrl } from "./api/melon/baseUrl";

export default function Home({ initialData }: { initialData: MelonChartList }) {
  return (
    <>
      <Head>
        <title>Create Next App</title>
        <meta name="description" content="Generated by create next app" />
        <meta name="viewport" content="width=device-width, initial-scale=1" />
        <link rel="icon" href="/favicon.ico" />
      </Head>
      <Background>
        <HeaderContainer>🎶 실시간 노래 차트 🎶</HeaderContainer>
        <main className={styles.main}>
          <MusicList initialData={initialData} />
        </main>
      </Background>
    </>
  );
}

export async function getStaticProps() {
  try {
    const response = await baseUrl.get(`/chart/day`);
    const initialData = Object.values(response.data);

    return {
      props: { initialData },
      revalidate: 3600, // 1시간마다 재생성
    };
  } catch (error) {
    console.error("데이터 가져오기 실패:", error);
    return {
      props: { initialData: [] },
      revalidate: 3600,
    };
  }
}

export const Background = styled.div`
  display: flex;
  flex-direction: column;
  width: 100%;
`;

export const HeaderContainer = styled.div`
  display: flex;
  align-items: center;
  width: 80%;
  margin: 10px auto;
  background-color: pink;
  padding: 20px 0px;
  font-size: x-large;
  font-weight: bold;
`;
// components/MusicList.tsx
import { useChart } from "@/hooks/queries/melon/useChart";
import { chartTypeAtom } from "@/store/atom";
import { ChartType, MelonChartList } from "@/types/melon.type";
import { useAtom } from "jotai";
import { useRouter } from "next/router";
import { useEffect } from "react";
import styled from "styled-components";
// FilterBtnList 정의
const filterBtnList: FilterBtnListType[] = [
{ type: "day", name: "일간" },
{ type: "week", name: "주간" },
{ type: "month", name: "월간" },
{ type: "live", name: "실시간" },
];
export default function MusicList({
initialData,
}: {
initialData: MelonChartList;
}) {
const [chartType, setChartType] = useAtom(chartTypeAtom);
const {
data: chartList,
isLoading,
isError,
} = useChart({
initialData: chartType === "day" ? initialData : undefined,
});
const router = useRouter();
// 데이터 확인용 로그
useEffect(() => {
console.log("데이터:", chartList);
}, [chartType, chartList]);
if (isLoading) return <div>로딩 중...</div>;
if (isError) return <div>오류 발생...</div>;
if (!chartList) return <div>데이터가 없습니다...</div>;
return (
<MusicListContainer>
{/* 필터 버튼 */}
<FilterBtnContainer>
{filterBtnList.map(({ type, name }) => (
<FilterBtn
key={type}
active={chartType === type}
onClick={() => setChartType(type)}
>
{name}
</FilterBtn>
))}
</FilterBtnContainer>
{/* 음악 목록 */}
{chartList.map((item, index) => (
<MusicOneContainer key={index}>
<RankSection>{index + 1}</RankSection>
<MusicSection onClick={() => router.push(`/song/${item.songId}`)}>
{`🎵: ${item.name} 🎤: ${item.artists}`}
</MusicSection>
</MusicOneContainer>
))}
</MusicListContainer>
);
}
// Styled Components 정의
export const MusicListContainer = styled.div`
display: flex;
flex-direction: column;
gap: 10px;
width: 80%;
margin: 0px auto;
`;
// 나머지 Styled Components...4. 결론 ❤🔥
이와 같은 접근 방식은 최신 Next.js 애플리케이션에서 권장되는 데이터 fetching pattern으로, 서버 사이드 렌더리와 클라이언트 사이드 상태 관리의 장점을 최대한 활용하여 성능과 사용자 경험을 모두 개선합니다 :)
'인턴' 카테고리의 다른 글
| hooks, lib, utils, services, api 폴더 차이점 (0) | 2025.04.09 |
|---|---|
| [ Troubleshooting🛠️ ] Next.js 서버사이드 렌더링에서 styled-components 적용하기 (0) | 2025.04.08 |
| Docker 입문 가이드: 설치부터 개념까지 (0) | 2025.04.08 |
| [ Troubleshooting🛠️ ] Tanstack Query의 데이터 로딩 (0) | 2025.04.07 |
| [ Troubleshooting🛠️ ] CORS 문제 해결 (0) | 2025.04.07 |